Windows XP Events and Errors Database
The Windows XP Events and Errors search page provides an easy-to-search, online reference for the error and event messages generated by Windows XP Professional. Find detailed explanations, recommended user actions, and links to additional support and resources. Source: Microsoft.com
WebCast: Basic "Blue Screen" Error Troubleshooting
Microsoft Knowledge Base Article: 325011 - In this session, we will cover the basics of "blue screen" errors, what they mean, and some common methods to troubleshoot the problems. We will provide some background information about blue screen errors, and we will talk about how to interpret the information, as well as how to recover from these errors.
How to Troubleshoot a Stop 0xC0000218 Error
Microsoft Knowledge Base Article: 314874 - On your Windows-based computer, you may receive one of the following messages about a Stop error:
Troubleshooting a Stop 0x0000000A Error in Windows XP
Microsoft Knowledge Base Article: 314063 - This article discusses how to troubleshoot the following Stop error in Windows XP:
Windows XP Generates a "Stop 0xA0" Error Message During Hibernation
Microsoft Knowledge Base Article: 320899 - When you try to hibernate a Windows XP-based computer, you may receive a "Stop 0xA0" error message on a blue screen.
Windows XP Generates a "Stop 0xA0" Error Message During Hibernation
Microsoft Knowledge Base Article: 320899 - When you try to hibernate a Windows XP-based computer, you may receive a "Stop 0xA0" error message on a blue screen.
How to Debug a Stop 0xC2 or Stop 0x000000C2 Error
Microsoft Knowledge Base Article: 314492 - This article explains how to debug Stop C2 errors.
"Stop 0x000000EA" Error Message When You Run Video-Intensive Programs
Microsoft Knowledge Base Article: 314215 - When you run a video-intensive program, such as a movie or a video game, you may receive one of the following stop error messages and bugcheck information:
"STOP 0x000000ED UNMOUNTABLE_BOOT_VOLUME" Error Message During Windows XP Upgrade
Microsoft Knowledge Base Article: 297185 - When you first restart your computer during the upgrade to Windows XP or when you start Windows XP, you may receive the following error message:
Stop 0x000000ED Error Message When Volume on IDE Drive with Caching Enabled Is Mounted
Microsoft Knowledge Base Article: 315403 - When you use volumes that use the NTFS file system on integrated device electronics (IDE) drives with caching enabled, you may receive the following error message during startup:
Stop 0x000000D1 Error Message When You Turn Your Computer Off
Microsoft Knowledge Base Article: 317326 - When you shut down your computer that has one or more universal serial bus (USB) devices attached to it, you may receive the following error message on a blue screen:
"STOP 0x0000001E" Error Message During Windows Setup Microsoft Knowledge Base Article: 314451 - When you run Windows XP Setup, you may receive an error message similar to the following:
HOW TO: Troubleshoot "Stop 0x0000007B" Errors in Windows XP Microsoft Knowledge Base Article: 324103 - This step-by-step article describes how to troubleshoot "Stop 0x0000007B" error messages in Windows XP. A "Stop 0x0000007B" error message may appear on a blue screen when you start your computer. The error message includes the following information
General Causes of STOP 0x0000007F Errors Microsoft Knowledge Base Article: 314102 - This article discusses the possible causes and the meaning of the following Stop message, which you may receive while you are running Windows XP.
"STOP: C0000221 Unknown Hard Error" or "STOP: C0000221 STATUS_IMAGE_CHECKSUM_MISMATCH" Error Message Occurs
Microsoft Knowledge Base Article: 314474 - You may receive any of the following STOP error messages:
A Stop: 0xc000026C or Stop: 0xc0000221 "Unable to Load Device Driver" Error Occurs When You Start Windows XP
Microsoft Knowledge Base Article: 315241 - When you start Windows XP, you may receive one of the following errors:
Troubleshooting a Stop 0x9F Error in Windows XP
Microsoft Knowledge Base Article: 315249 - You may receive the following error:
Windows XP Generates a "Stop 0xA0" Error Message During Hibernation
Microsoft Knowledge Base Article: 320899 - When you try to hibernate a Windows XP-based computer, you may receive a "Stop 0xA0" error message on a blue screen.
You Receive a Stop 0x0000007B Error After You Move the Windows XP System Disk to Another Computer
Microsoft Knowledge Base Article: 314082 - After you move the system (boot) disk to a backup computer, you may receive the following Stop error when you try to start the Windows-based backup computer:
You Receive a Stop 0x0000007B Error After You Move the Windows System Disk to Another Computer
Microsoft Knowledge Base Article: 314082 - After you move the system (boot) disk to a backup computer, you may receive the following Stop error when you try to start the Windows-based backup computer:
Friday, July 25, 2008
Linux Shortcuts
Here are a few keyboard shortcuts you can use to perform common tasks quickly. Many more are available in addition to what is listed here. For more command line and keyboard shortcuts.
- [Ctrl] + [Alt] + [Backspace] = kills your current X session. Kills your graphical desktop session and returns you to the login screen. Use this if the normal exit procedure does not work.
- [Ctrl] + [Alt] + [Delete] = shutdown and reboots your Red Hat Linux system. Shuts down your current session and reboots the OS. Use only when the normal shutdown procedure does not work.
- [Ctrl] + [Alt] + [Fn] = switches screens. [Ctrl]+[Alt] + one of the function keys displays an available screen. By default, [F1] through [F6] are shell prompt screens and [F7] is the graphical desktop screen.
- [Alt] + [Tab] = switches tasks in a graphical desktop environment. If you have more than one application open at a time, you can use [Alt] + [Tab] to switch among open tasks and applications.
- [Ctrl] + [a] = moves cursor to the beginning of a line. This works in most text editors and in the URL field in Mozilla.
- [Ctrl] + [d] = logout of (and close) shell prompt. Use this quick shortcut instead of typing exit or logout.
- [Ctrl] + [e] = moves cursor to end of a line. This works in most text editors and in the URL field in Mozilla.
- [Ctrl] + [l] = clears the terminal. This shortcut does the same thing as typing clear at a command line.
- [Ctrl] + [u] = clears the current line. If you are working in a terminal, use this shortcut to clear the current line from the cursor all the way to the beginning of the line.
- [Middle Mouse Button] = pastes highlighted text. Use the left mouse button to highlight the text. Point the cursor to the spot where you want it pasted. Click the middle mouse button to paste it. In a two mouse system, if you configured your mouse to emulate a third mouse button, you can click both the left and right mouse buttons simultaneously to perform a paste.
- [Tab] = command autocomplete. Use this command when using a shell prompt. Type the first few characters of a command or filename and then press the [Tab] key. It will automatically complete the command or show all commands that match the characters you typed.
- [Up] and [Down] Arrow = shows command history. When using a shell prompt, press the [up] or [down] arrow to scroll through a history of commands you have typed from the current directory. When you see the command you want to use, press [Enter].
- clear = clears the shell prompt screen. Type this command to clear all visible data from the shell prompt screen.
- exit = logout. Type this at a shell prompt to logout of the current user or root account.
- history = shows history of commands. Type this at a shell prompt to see a numbered list of the previous 1000 commands you typed. To display a shorter list of previously used commands, type history followed by a space and a number. For example, history 20.
- reset = refreshes the shell prompt screen. Type this at a shell prompt to refresh the screen if characters are unclear or appear corrupt.
Windows Keyboard Shortcuts
Windows Vista Keyboard Shortcut Commands
Right SHIFT for eight seconds-Turns Filter Keys on and off
Left ALT+left SHIFT+PRINT SCREEN (or PRTSCRN)-Turns High Contrast on or off
Left ALT+left SHIFT+NUM LOCK-Turns Mouse Keys on or off
SHIFT five times-Turns Sticky Keys on or off
NUM LOCK for five seconds-Turns Toggle Keys on or off
Windows logo key +U-Opens the Ease of Access Center
CTRL+C- Copy the selected item
CTRL+X-Cut the selected item
CTRL+V-Paste the selected item
CTRL+Z-Undo an action
DELETE-Delete the selected item and move it to the Recycle Bin
SHIFT+DELETE-Delete the selected item without moving it to the Recycle Bin first
F2-Rename the selected item
CTRL+RIGHT ARROW-Move the cursor to the beginning of the next word
CTRL+LEFT ARROW-Move the cursor to the beginning of the previous word
CTRL+DOWN ARROW-Move the cursor to the beginning of the next paragraph
CTRL+UP ARROW-Move the cursor to the beginning of the previous paragraph
CTRL+SHIFT with an arrow key-Select a block of text
SHIFT with any arrow key-Select more than one item in a window or on the desktop, or select text within a document
CTRL+A-Select all items in a document or window
F3- Search for a file or folder
ALT+ENTER-Display properties for the selected item
ALT+F4-Close the active item, or exit the active program
ALT+SPACEBAR-Open the shortcut menu for the active window
CTRL+F4-Close the active document (in programs that allow you to have multiple documents open simultaneously)
ALT+TAB-Switch between open items
CTRL+ALT+TAB-Use the arrow keys to switch between open items
Windows logo key +TAB-Cycle through programs on the taskbar by using Windows Flip 3-D
CTRL+Windows logo key +TAB-Use the arrow keys to cycle through programs on the taskbar by using Windows Flip 3-D
ALT+ESC-Cycle through items in the order in which they were opened
F6-Cycle through screen elements in a window or on the desktop
F4-Display the Address bar list in Windows Explorer
SHIFT+F10-Display the shortcut menu for the selected item
CTRL+ESC-Open the Start menu
ALT+underlined letter-Display the corresponding menu
ALT+underlined letter-Perform the menu command (or other underlined command)
F10-Activate the menu bar in the active program
RIGHT ARROW-Open the next menu to the right, or open a submenu
LEFT ARROW-Open the next menu to the left, or close a submenu
F5-Refresh the active window
ALT+UP ARROW- the folder one level up in Windows Explorer
ESC-Cancel the current task
CTRL+SHIFT+ESC-Open Task Manager
SHIFT when you insert a CD Prevent the CD from automatically playing
------------------------------------------------------------------------
CTRL and A- Selects all the items in the active window.
CTRL and C- Copies the item or items to the Clipboard and can be pasted using CTRL and V.
CTRL and F- Displays the Find all files dialog box.
CTRL and G-Displays the Go to folder dialog box.
CTRL and N-Displays the New dialog box.
CTRL and O-Displays the Open dialog box.
CTRL and P-Displays the Print dialog box.
CTRL and S-Displays the Save dialog box.
CTRL and V-Pastes the copied item or items from the Clipboard.
CTRL and X-Cuts the item or items selected to the Clipboard.
CTRL and Z-Undoes the last action.
CTRL and F4-Closes the active document window.
CTRL while dragging an item
Copy the selected item
CTRL+SHIFT with arrow keys-Highlight a block of text
CTRL+F4-Close the active document
CTRL+ESC-Display the Start menu
CTRL and F6-Opens the next document window in the active application.
ALT+ENTER-View the properties for the selected item
ALT+F4-Close the active item, or quit the active program
ALT+SPACEBAR-Open the shortcut menu for the active window
ALT+TAB-Switch between the open items
ALT+ESC-Cycle through items in the order that they had been opened
F1 key-Gives help on the active window or selected item.
F2 key-Rename the selected item
F3 key-Search for a file or a folder
F4 key-Display the Address bar list in My Computer or Windows Explorer
F5 key -Update the active window
F6 key-Cycle through the screen elements in a window or on the desktop
F10 key-Activate the menu bar in the active program
Windows Logo-Display or hide the Start menu
Windows Logo+BREAK-Display the System Properties dialog box
Windows Logo+D-Display the desktop
Windows Logo+M-Minimize all of the windows
Windows Logo+SHIFT+M
Restore the minimized windows
Windows Logo+E-Open My Computer
Windows Logo+F-Search for a file or a folder
CTRL+Windows Logo+F-Search for computers
Windows Logo+F1-Display Windows Help
Windows Logo+ L-Lock the keyboard
Windows Logo+R -Open the Run dialog box
Windows Logo+U-Open Utility Manager
TAB-Move forward through the options
SHIFT+TAB-Move backward through the options
CTRL+TAB-Move forward through the tabs
CTRL+SHIFT+TAB-Move backward through the tabs
ALT+Underlined letter-Perform the corresponding command or select the corresponding option
ENTER-Perform the command for the active option or button
SPACEBAR-Select or clear the check box if the active option is a check box
F1 key-Display Help
F4 key-Display the items in the active list
Arrow keys-Select a button if the active option is a group of option buttons
BACKSPACE-Open a folder one level up if a folder is selected in the Save As or Open dialog box
END-Display the bottom of the active window
HOME-Display the top of the active window
NUM LOCK+Asterisk sign (*)-Display all of the subfolders that are under the selected folder
NUM LOCK+Plus sign (+)-Display the contents of the selected folder
NUM LOCK+Minus sign (-)-Collapse the selected folder
LEFT ARROW-Collapse the current selection if it is expanded, or select the parent folder
RIGHT ARROW-Display the current selection if it is collapsed, or select the first subfolder
Black Sony 2X SATA Blu-ray Disc Drive, 8X DVD-ROM, 24X CD-ROM, BR-5100S
UPDATE :

Black Sony 2X SATA Blu-ray Disc Drive, 8X DVD-ROM, 24X CD-ROM, BR-5100S
Enjoy Blu-ray Disc movies and look forward to visual experiences in a completely new dimension: The new BR-5100S Blu-ray Disc ROM internal drive with S-ATA interface makes it possible. This versatile device allows you to play back BD, DVD and CD formats for Windows Vista and Microsoft Windows XP. This is an OEM drive.
Specifications:
>Read Speed (max.): BD: 2x, DVD: 8x, CD: 24x.
>Access Time: BD: 300 ms, DVD: 190 ms, CD: 190 ms.
>Mechanism: motorized tray load mechanism for horizontal and vertical use.
>Interface: S-ATA.
>Burst transfer rate: 150 MByte/s.
>Cache Memory: 4.5 MBytes.
>Media supported (finalized disc only): BD-R, BD-R DL, BD-RE, BD-RE DL, DVD-R, DVD-ROM, >DVD-R, DVD-R DL, DVD-RW, DVD +R, DVD +R9, DVD +RW, CD-R and CD-RW with 80mm and 120mm diameter.
Modes supported: BD-ROM, BD-AV, DVD-ROM, DVD-Video, CD-DA, CD-ROM (XA), CD Extra, Video CD, Photo CD, CD Text.
Compatibility: MultiRead, MS WinXP & Vista compatible.
Dimensions: 148 mm x 42 mm x 190 mm.
System Requirements:
Pentium D 3.4 GHz or faster (Recommend Core 2 Duo 2.4 GHz or higher).
-512 MB RAM or more (Recommend 1GB or more).
-HDCP-supported display with HDMI or DVI video input (Recommend 1,920x1,080 resolution or higher).
-PCI Express compatible.
-HDCP-supported graphic card with HDMI or DVI video output with 256 MB video RAM.
-NVIDIA GeForce 7600 or ATI RADEON X1600 or higher (Highly recommend NVIDIA.
-GPU with PureVideo HD technology or ATI GPU with UVD technology e.g. GeForce 8600/8500/8400 or RADEON HD2600/2400).
-Internet connection (Recommend broadband).
-Windows Vista Home Basic.
-Home Premium, Ultimate.
-Business oder Windows XP Home/Professional.
-Blu-ray playback software.
Tuesday, July 22, 2008
IDE MicroFlash Disk Overview

The MagicRAM IDE MicroFlash Disk is a storage device based on flash memory technology, which emulates an ordinary magnetic hard disk drive. It provides an all in one module solution for solid-state flash storage.
Fully IDE compatible, the IDE MicroFlash Disk is the perfect choice to replace rotating magnetic hard drives. It is suitable for use in portable and embedded systems, which have limited space and power consumption.
IDE MicroFlash Disk is implemented using NAND type flash memory, which is a high density, non-volatile read/write device. Flash data retention is guaranteed for at least 10 years, with no battery or other power source required.
IDE MicroFlash features low power consumption, high capacity storage and contains no moving parts which are the primary cause of failure and electro-mechanical delays in conventional hard drives.
It operates efficiently in harsh environments and under rugged usage. The IDE MicroFlash Disk is resistant to shock and vibration, thus making it the optimal solution for industrial, transportation, aerospace and military applications. It is completely bootable and no additional software such as Flash File System or Memory Technology Driver Software are required.
Available in capacities from 32MB to 4GB in vertical and horizontal format.
Some Common Errors
Windows will not allow me to safely remove my drive. It keeps reporting the drive is busy or in use .
This is usually caused by a program that is trying to read from the drive.
When it does not complete the action successfully, the cause is usually a program that is trying to read from the drive.
Of course, it is always a safe removal to shut down/reboot the computer and turn off/disconnect the drive while the computer's power is down, but that is not always a convenient solution.
Step 1: Try the drive on another computer so as to attempt to isolate the problem. If the problem does not repeat itself on the second computer, then it might well be system-related. If the problem follows the drive, then continue troubleshooting.
Step 2: A process that can hold up the drive is "explorer.exe". This is because of the Windows Recycle Bin.
The Recycle Bin may need to be disabled.
Right-click on the Recycle Bin on the desktop.
1.Select Properties.
2.Select the Global tab.
3.Select "Configure drives independently" (instead of "Use one setting for all drives" ).
4.Select the USB drive letter tab on the top.
5.Put a check in the "Do not move files to the Recycle Bin" checkbox.
6.Click OK.
Warning ! Disabling the Recycle Bin will cause deleted files to be permanently deleted immediately.
Note : This option may not be available in Windows Vista.
Step 3: If you have Norton System Works installed, the Safely Remove Hardware icon in the System Tray will not work with the external drive because of the Norton Protected Recycle Bin. If your Windows Recycle bin on the desktop has an "N" with a shield then Norton is running a special software on your system.
This is a known issue. Please see Symantec's article on "How to Remove the Norton Protected Recycle Bin".
Step 4: Other software like antivirus programs, or any programs or image files that remain open on the drive (even Windows Explorer if its window is open and displaying the contents of the external drive) can prevent safe removal. Close all programs and any open files or windows displaying the drive contents and attempt to remove the drive again.
Step 5: In Windows Vista/XP/2000, please follow these directions:
1. Right-click on My Computer (Computer in Vista)
2. Select Manage.
3. Select Device Manager.
4. Open Disk Drives.
5. Double-click on the hard drive's model number.
6. Go to the Policies tab.
7. Check whether the drive is set to Optimise for Quick Removal.
If so, the hard drive does not need to be Safely Removed manually from the system. Just turn off the hard drive or disconnect it at your convenience whenever the hard drive is not busy transferring data. This way there is only a slim chance that the partition will be corrupted by a removal. This carries no risk for the drive hardware, but it does put your data at a small risk.
Note :Please remember that you would be very unwise to put yourself in a situation where that is a concern for you. If this drive were to experience a sudden mechanical or electronic failure or if it should fall, or if the drive's partition should become corrupted, your data could be lost and data recovery is very expensive. Remember that this is a backup drive, and a backup is defined as "a second copy of data in a second storage media". Whether on a second external hard drive, a CD or DVD, an internal hard drive, a network hard drive, or tape, make a 2nd copy of your data today and keep it. If not, please continue.
Step 6: If the Windows Media Player Library is configured to monitor a folder on the external drive for new content it will not allow a Safe Remove
Note : Instructions may vary depending on the version of Media Player.
1. Open Media Player.
2. From the top menu, choose Tools, then Options.
3. Choose the Library tab.
4. Click the Monitor Folders button.
5. View the Advanced Options.
6. Remove items that point to the drive letter used by the external drive (ie, E: or F:).
Note :Other multimedia applications may have similar issues if they automatically add new music to their library by monitoring file locations, specifically on the external drive.
Step 7: If Windows Media Center is set to record shows, podcasts, etc. to the external drive, Windows may not allow the removal of the external drive.
------------------------------------------------------------
My external drive is not detected in Windows XP/2000 (and displays a yellow ! icon next to it in the Device Manager)
If your external drive is not detected in Windows XP/2000, it is always a good idea to check the Disk Management and Device Manager.
1. Right-click on My Computer.
2. Click on Manage.
3. Choose Disk Management from the left column.
4. Try to find the external drive in the lower window. It should be "Disk 1" or some other number (but not Disk 0).
5. Then choose Device Manager from the left column.
6. Choose Disk drives.
7. If the drive is not seen there, check under Universal Serial Bus Controllers (if the drive is connected via USB). The drive should appear as a USB Mass Storage Device.
8. If a yellow ! icon is displayed next to it, double-click on the drive.
9. A Properties window will appear and will probably say "This device is not working properly" and will give either (Code 28) or (Code 10).
10. If Code 10 appears, the drive has most probably failed. Verify by trying the drive with another USB cable or port, or on another computer.
11. If Code 28 appears, you will need to test the drive on another computer. If the drive works fine on another computer, there are a few steps to follow:
a. Open a Windows Explorer window (right-click on Start > Explore).
b. In the address bar, type c:\windows\inf and press Enter.
c. Right-click on the file INFCACHE.1.
d. Select Properties.
e. Click on the "Security" tab.
f. Click "Edit" to edit permissions.
g. Click "Add" to add Group or User name.
h. Delete the file.
i. Reboot and the file should be rebuilt, correcting the problem.
j. If that fails, you will need to try to reload the USB drivers for the operating system by inserting your Windows install CD, rebooting, and attempting a Repair/Restore.
Warning! This can be dangerous to your data and you should disconnect your external drive before attempting this.
-------------------------------------------------------------------------
STOP errors in Windows
Stop errors are difficult to diagnose since they are so diverse.A good place to start troubleshooting is the Microsoft Support knowledgebase.Experiment with the problem by
1. shutting down the computer, removing the external drive, and working for a while with the drive disconnected .
2. checking the Windows Event Viewer for entries around the time the STOP error occurred .
3. connecting the drive again once the computer is on and has been functioning properly for a while .
4. connecting the drive to a different Windows computer to see if the problem follows the external drive.
-------------------------------------------------------------------
Drive clicks when I plug it in and does not show up in My Computer
This issue occurs if the Seagate Portable, Seagate FreeAgent Go, or Maxtor OneTouch Mini are plugged into a USB port that does not provide enough power (usually a USB 1.x port) or into an unpowered USB hub. These drives come with a special USB cable (see the figure below) that allows the drive to use additional power from another USB connector.
If the drive clicks and is not detected, attempt the following:
1. Plug in the Power + Data connector labeled #1 on the figures below.
2. Plug in the Power only connector labeled #2 on the figures below.
3. Connect the USB cable into the back of the drive (item #3 on the figures below).


----------------------------------------------------------------
Delayed Write Failure
There are many causes for delayed write failures, most of which are specific to an individual computer
The majority of the time, this error occurs with external drives connected via USB or 1394/Firewire.
Step 1: Taking a drive to a different computer will often fix the error. If the error no longer appears on the second computer, then the problem is system-related on the first computer; it is not drive-related. If the problem does not recur, there could be a problem with the USB port on your computer. Be certain to try connecting your hard drive directly to the USB port on the rear of your computer If the problem follows the drive, please replace the USB cable and try again.
Step 2: If your external drive is connected via a USB hub (which connects to one USB port on your computer but contains multiple USB ports, to allow connection of more devices), try connecting your hard drive directly to the USB port on the rear of your computer.
Connecting the drive to a powered USB hub is another possible solution.
Step 3: Remove all other USB or Firewire devices from the computer (leaving only the external drive connected) to see whether the error appears again.
Step 4: If two USB or 1394/Firewire devices are connected to ports on the same USB or 1394/Firewire PCI card, these errors can occur. Try connecting only one external drive to the computer. If the problem stops, a PCI USB card may help if you need to use multiple external drives simultaneously on the same computer.
Step 5: Please run a diagnostic test on the drive.
Step 6: Follow this procedure:
1.Right-click on My Computer (in XP/2000) (Computer in Vista).
2.Click on Manage.
3.Choose Device Manager.
4.Choose Disk drives.
5.Right-click on the hard drive.
6.Choose Properties.
7.Choose the Policies tab.
8.Set the drive to "Optimize for Quick Removal".
If this does not work, or if this value was already set, continue on.
Step 7: Confirm you are on the current Service Pack level for Windows.
For Windows XP
For Windows 2000
Step 8: If you have Windows XP Service Pack 2 for Windows XP, review Microsoft KB article 885464.
Step 9: Always use the safely remove hardware function of Windows when disconnecting the external drive. If the drive was disconnected while a file was being written to the drive, this error could occur.
Step 10: Confirm that some of the communication between the computer and the external drive is not blocked by a firewall. Windows XP Service Pack 2 has an added feature called a firewall which helps protect your system from being accessed from the outside. This firewall feature is enabled by default when you install Service Pack 2 and it can block transfers to/from the external drive. This normally happens on the 1394/Firewire port, but has also been seen on the USB port.
Step 11 : Also do a power cycle for the computer .
1. Shutdown the computer.
2. Unplug the power supply from the computer .
3. Unplug the drive from the computer .
4. Keep the power button of the computer pressed for 20 seconds without the power supply .
5. Restart the computer without any drives connected .
6. Reconnect the drive .(Most of the cases this procedure resolves the issue, also try with different USB cable, still remains oops bad drive) .
How can I install Windows Vista?
------------------------------------------------------------------------------------------------
->Check System Requirements
->Check Hardware and Software Compatibility
->Determine Disk Partitioning Options
->Decide on a Workgroup or Domain Installation
->Complete a Pre-Installation Checklist


11. After the long wait, the system will then reboot once again.
12. You will think something went wrong because of the relative long time it take the system to display anything besides the black screen, but finally, after a few moments you will note a small colored circle:


Step #1: Plan your installation
When you run the Windows Vista Setup program, you must provide information about how to install and configure the operating system. Thorough planning can make your installation of Windows Vista more efficient by helping you to avoid potential problems during installation. An understanding of the configuration options will also help to ensure that you have properly configured your system.
Here are some of the most important things you should take into consideration when planning for your Windows Vista installation:
Here are some of the most important things you should take into consideration when planning for your Windows Vista installation:
->Check System Requirements
->Check Hardware and Software Compatibility
->Determine Disk Partitioning Options
->Decide on a Workgroup or Domain Installation
->Complete a Pre-Installation Checklist
After you made sure you can go on, start the installation process
Step #2: Beginning the installation process
Step #2: Beginning the installation process
You can install Windows Vista in several methods - all are valid and good, it all depends upon your needs and your limitations. In this manual I will focus on the simplest form of installation - directly from the Windows Vista DVD media. So, insert your Windows Vista DVD media into your DVD drive and reboot your computer. A black window will appear momentarily while the DVD content is read.

Step #3: The GUI-based portion of the Setup program
Unlike previous versions of Windows, Windows Vista does not have a noticeable text phase of the setup process, and it will boot directly into the Graphical User Interface (GUI) mode.
1. After a few moments you will see the first prompt:

Press Next unless you want to change some regional settings for the installation process.
2. Press the Install now button.

3. After a short delay you're be prompted to enter your product key:

You can configure Windows Vista to install without having to manually enter the product key during the setup process. This is quite useful if you find yourself in need to perform an installation of the OS but without having the (legal) product key with you at that very moment. Unlike previous Windows versions where you had to have a CD Key handy during the installation of the OS, the Windows Vista setup process only makes it appear as if you have to enter a product key to install it.

During the setup program's progress you will reach a dialog box that will ask you to enter a valid product key. Here is where the fun part starts. You can actually leave it blank!

Next click No in response to the "Are you sure" dialog box. You will now be presented with a list of all the different Windows Vista versions available on the DVD. Yes, the cool thing about the Windows Vista DVD is that every DVD has every version of Vista available for you to pick from, and the product key you own is the only thing that tells the setup process what version of Vista it should install.

Noww pick any one from that list and use it for up to 14 days without any having any issues. After 14 days you will need to enter a valid product key or do a fresh install from the beginning.
This "feature" will in fact help you if you'd like to test the different versions of Vista before deciding which one to buy.
This "feature" will in fact help you if you'd like to test the different versions of Vista before deciding which one to buy.
4. You now have to accept the license terms:

5. Next you need to press the Custom (Advanced) installation type button:

The Upgrade button is disabled because this specific installation if performed on a new computer without any previous operating system on it.
6 . The next phase is to pick the installation partition. Since this computer has a new hard disk that hasn't been formatted before, you will only have the option to create a new partition on it. Had it had previous partitions on it you could have chosen to either delete them or perform other tasks. Pressing the Advanced button will bring up the following options.

Since we don't need to perform any additional task we will just press on the Next button. The installation process will then create a partition on all the available disk space, and format it.

7. The setup process will now begin to copy files from the installation DVD media to the hard disk.

This will take some time:

8. After some time (the exact amount of time will greatly depend on your computer's hardware), the setup process will install updates for the operating system.

9. The computer will then automatically reboot.

10 . Now comes a long waiting period, where the installation process configures the system. Again, the exact amount of time will greatly depend on your computer's hardware.

10 . Now comes a long waiting period, where the installation process configures the system. Again, the exact amount of time will greatly depend on your computer's hardware.

11. After the long wait, the system will then reboot once again.
12. You will think something went wrong because of the relative long time it take the system to display anything besides the black screen, but finally, after a few moments you will note a small colored circle:

13. A few seconds after that you will be prompted to enter a username and password for the first user on the computer.

14. Pick a name for your computer. The setup program will create one based upon the username you chose in the previous step, but you can change it now (and later).

Pick a name for your computer. The setup program will create one based upon the username you chose in the previous step, but you can change it now (and later).
15. Choose what sort of protection your computer gets. The recommended settings are best for someone that doesn't plan to hide their computer behind a corporate firewall (and even then, in some cases, this would be the best option). If you plan to install a 3rd-party firewall later you can opt to be prompted later.

Note that this setting will also have effect on how the computer uses the Microsoft Windows Update (Automatic Updates) features.
16. Next comes the Time Zone settings window. Choose your location.
A note for Israeli users: Finally! Windows Vista has the DST setting enabled for us!!!

17. Again a long wait and some promotional screens you see the hourglass circling around, in preparation for the first logon.
18. Finally, the first screen appears, you're ready to rock and roll!
Note that if the computer was connected to the Internet while installing it, it will automatically download and prompt you to install any missing hotfix or update it finds for the current state of the operating system.
Done!
------------------------------------------------------------------------------------------------
How to Properly Install the Windows 98 Operating System
-------------------------------------------------------------------------------------------------
In this article I will teach you to install Windows 98 First or Second Edition on a computer with a formatted or even unformatted hard drive!
What you will need:
1. Windows 98 CD
2. Computer with CD-ROM Access
Configuring your BIOS for the Install:
To find out how to access the BIOS please refer to your motherboard manual or the manufacturer of your computer. (The system BIOS can usually be entered on boot, usually by pressing the F1, F2, F8, F10 or DEL key. Make sure you save the settings before exiting.If you are unsure or don't want to enter the BIOS then just test the computer by putting the CD-ROM in the drive and rebooting the computer. This is the recommended way to install Windows 98.
Starting The Setup:
1. Insert the Windows CD and restart your PC.
2. Once the Windows 98 Setup Menu comes up choose option #2 (Boot from CD-ROM)
3. Then the Windows 98 Startup Menu will come up. Select Option #1. (Start Windows 98 Setup from CD-ROM)
4. Now your computer will install some drivers so please wait for a few moments.
5. Now a blue setup screen will come up. Press Enter.
6. Setup then wants to do some system tests. Just press Enter.
7. Scandisk will now run, please wait.
8. After ScanDisk completes, Windows will copy a few important files for setup.
9. Now the graphical Windows 98 Setup Screen will come up.
10. Click Continue and wait for the setup wizard to complete.
11. Now it will ask you in which directory to install Windows too. The default directory is just fine so click Next.
12. Setup will now prepare the directory, please wait.
13. Setup will now check for installed components and disk space, please wait.
14. Setup will now prompt you to choose the type of installation. Choose Typical if you have a desktop computer or Portable if it is a laptop.
15. Windows will prompt you to install components, just choose Continue.
16. If a network card is detected a network information screen will appear. Type in the required information and click Next
17. Select your country settings, United States should be chosen by default.
18. Now finally the main part of Setup is here. Setup will start copying files. This could take some time, please be patient.
19. Once setup is done copying files, Windows will restart automatically.
20. The Windows 98 Startup Menu will now appear. Select option #1 (Boot from Hard Disk)
21. The Windows 98 booting screen will appear!
22. Now Windows will prompt you for user information, enter it and click Continue.
23. Now the License Agreement. Read it and if you agree click on "I accept the Agreement" and click Next. If you select "I don't accept the Agreement" then setup will end.
24. Now input your product key or certificate authenticity code. This is 16 digits and is located on the back of your CD case or on the Windows 98 Book. If you have an OEM computer then it could be on the side or back of your computer. Click Next to continue.
Click Finish.
25. Setup will now finalize the hardware and install settings.
26. Setup will now install plug and play devices.
27. Your computer will restart automatically.
28. The Windows 98 Startup Menu will appear. Select option #1 (Boot from Hard Disk)
29. Windows will start booting for the second time.
30. Setup will continue installing hardware.
31. Now setup will prompt you to enter in your time, date, and time zone. Once selected click on 32. Apply and then OK.
33. Windows will continue to setup Windows items.
34. The computer will restart automatically once again.
35. The Windows 98 Startup Menu will appear. Select option #1 (Boot from Hard Disk)
36. Windows will boot for the third time.
37. Windows will update system settings.
38. Now finally you have reached the Windows Desktop!
39. You also may need to install your hardware drivers. If everything is working properly then you shouldn’t worry about them.
Enjoy your new freshly installed Windows 98 computer!
-------------------------------------------------------------------------------------------------
Monday, July 21, 2008
To format the drive for Mac OS X (Jaguar, Panther and Tiger)
2. Launch the Disk Utility

3. Select your new drive from the list on the left. A description of the drive appears in the right window.

Formatting the drive in the older versions of Mac .
Step1.
After hooking up the hard drive either boot off the CD or the main Macintosh HD then go to the Apple System Profiler located under the Apple menu. From there go to Devices and Volumes and check to see if the hard drive that is going to be formatted is properly displayed. If the drive is not displayed make sure that the drive is properly installed or connected.

Step 2.
Once the drive is detected and determined to be the one that is to be formatted go to the System Folder, Utilities, Drive Setup, and 'click' on the "Drive Setup" icon.

Step 3
'Click' on the drive you want to format then 'click' Initialize.
.gif)
'Click' either on Initialize for a single volume format or 'click' on Custom Setup to specify type of format, partition, and size. For Custom Setup instructions go to Step 4.
.gif)
Step 4.
In Custom Setup select the Partition Scheme, the type of format, and the size. Then 'click' on OK.

Step 5.
This will then take you to the Initialize screen. 'Click' on initialize. After the drive initializes it will be ready for use.

Step 6.
To verify that the system recognizes the correct partitions, size, and format go back to Apple System Profiler and select the Devices and Volumes folder. Check the information from the pull downs.

Troubleshooting an internal ATA drive .
Computer Hardware Detection Issue - Check Master/Slave Jumper Configuration
Check Jumper Configuration
Jumper settings are very important when configuring a Parallel ATA (IDE) hard drive.
Jumper Illustrations
For Seagate Drives .

For Maxtor drives .

For Western Digital drives .

Check Power and Data Cables
So far you have checked your jumper settings. Now it is time to check the cables.
When troubleshooting hard drive problems it is important to check the cables. Parallel ATA (IDE) hard drives have two cables, a data cable and a power cable.
Ultra ATA Data Cables
Be sure you are using the latest in cabling technology, the UltraATA cable. These cables have additional conductors built into the cable to provide better signal quality at high speeds. If your drive runs in UltraATA modes higher than UltraATA33 (and any drive larger than 20 GB will) then these cables are required.
Figure 1 below shows a picture of an 80-conductor cable and a 40-conductor cable. Note that the 80-conductor cable has more ridges. Most 80-conductor cables are also color-coded (see figure 2 for more information). The maximum length for an UltraATA cable is 18 inches.
UltraATA cables also have specific placing for the master and slave drives. If the drive is the only drive on the cable or if the drive is the primary drive (master) it should be at the end of the cable (black connector). If the drive is an additional drive on the cable (slave), it should be in the middle of the cable (gray). The host adapter (motherboard) should be plugged into the other end of the cable (blue).


The Latest Product from Seagate
The Black Armour

Maxtor, the enterprise side of Seagate, is releasing the Maxtor Black Armor, an external 2.5” drive that supports security features like full-disk encryption, which is quite reassuring if the drive is lost. It can take years, decades or even more to crack a strongly encrypted drive (my advice: don’t forget the password).
The maximum capacity of the Maxtor Black Armor is 160GB. It costs $150 and comes with a bundle of backup-related Maxtor software.
Western Digital Internal Drive and its features .

WD VelociRaptor™ SATA Hard Drives300 GB, 3 Gb/s, 16 MB Cache, 10,000 RPMThe evolution of 10,000 RPM SATA technology.
The WD Raptor® has evolved! PC enthusiasts' favorite 10,000 RPM SATA drive is now faster than ever.
Capacities : 300 GB
Model: WD3000GLFS
WD VelociRaptor (Retail Kit)Price: $299.99
Engineered for maximum speed! WD VelociRaptor, the newest member of our unique class of 10,000 RPM SATA hard drives, combines a SATA 3 Gb/s interface and 16 MB cache, to deliver performance that's up to 35% faster than its speedy older brother.
Key Features
Killer Speed - Built on the performance bloodlines of WD Raptor, these 10,000 RPM drives, with SATA 3 Gb/s interface, and 16 MB cache deliver mind-bending performance. Not only are they 35 percent faster than the previous generation WD Raptor drives, but they also beat out all other competitors in the field.
Rock-solid Reliability - Designed and manufactured to mission-critical enterprise-class standards to provide enterprise reliability in high duty cycle environments. With 1.4 million hours MTBF, these drives have the highest available reliability rating on a high capacity SATA drive.
Double the Capacity - State-of-the-art technology packs twice the capacity per disk compared to its older brother WD Raptor resulting in 300 GB of high-performance storage space in this enterprise-class 2.5-inch drive. (Not compatible with notebook computers)
IcePack™ Mounting Frame - The 2.5-inch WD VelociRaptor is enclosed in a 3.5-inch enterprise-class mounting frame with a built-in heat sink that keeps this powerful little drive extra cool when installed in high-performance desktop chassis.
Rotary Acceleration Feed Forward (RAFF™) - Optimizes operation and performance when the drives are used in vibration-prone, multi-drive chassis.
SecurePark™ - Parks the recording heads off the disk surface during spin up, spin down and when the drive is off. This ensures the recording head never touches the disk surface resulting in improved long-term reliability and increased drive protection when the chassis is moved.
5-year limited warranty
Ideal For Performance enthusiast systems, workstations, and low-end servers
Compatibility
Windows
Windows Vista/XP/2000
SATA interface connector on motherboard or SATA host controller*
Available 3.5-inch internal drive bay*Compatibility may vary depending on user's hardware configuration and operating system.
Retail Kit Package Contents
3 Gb/s SATA hard drive
WD SATA interface cable
Quick Install Guide
Mounting screws
Western Digital Installation
Click on the link provided below which would guide you in installing a western digital drive .
http://www.wdc.com/en/library/sata/2779-001006.pdf
http://www.wdc.com/en/library/sata/2779-001006.pdf
Internal Drive Installation .
How To Install and Troubleshoot ATA Hard Drives
Do not drop or bump the drive.
Keep the drive in the protective anti-static container until ready to install.
Protect the drive from static discharge by wearing a grounded wrist strap. Attach the wrist strap to the metal chassis of your computer.
Handle the drive by the edges of the frame.
Do not apply pressure or attach labels to the circuit board or the top cover of the drive.
Turn off the power to the host system before installation.
What you need
Phillips screwdriver and four 6-32 UNC drive mounting screws.
Standard 40-pin ATA interface cable, or an 80-conductor cable if running UATA66/100/133 (max length: 18 inches).
An unused drive power cable for your new drive.
Needle-nose pliers for removing or adding jumpers.
UltraATA 66/100/133 Considerations
If your new drive can support UltraATA 66/100/133 modes and you want to take advantage of these faster transfer rates, you will need the following:
A computer that supports UDMA Modes 3 and 4 (5 for UltraATA100, 6 for UltraATA133).
A 40-pin, 80-conductor cable (available from your dealer). This cable is provided with current UltraATA hard drive retail kits. It can be identified by its having a blue connector to connect to the motherboard, a grey connector to connect to the slave drive, and a black connector to connect to the master drive.
Jumper Illustrations
Seagate Products :
http://www.seagate.com/images/support/en/us/u5_family_1.gif
Maxtor®/Quantum Products :
http://www.seagate.com/images/support/en/us/mxo_ata_jumpers.gif
Attaching Cables and Mounting the Drive
1. Locate a free device connector on the IDE interface cable in your computer.
2. Attach one end of the interface cable to the connector on the system board (see user's manual for locations). Align pin 1 on the cable with pin 1 on the connector. If using the 80-conductor cable, the blue connector should connect to the system board connector. The black connector goes to the Master and the Gray goes to the Slave.
3. Find an unused power connector on a cable coming from the computer power supply and attach it to the 4-pin DC power connector. The power connector is keyed so that it attaches one way only. DO NOT force it.
4. Mount the drive in either the horizontal or vertical position depending on your case orientation.
5. Slide the drive into the bay.
6. Secure the drive using four 6-32 UNC mounting screws. Caution: Do not overtighten the screws. Overtightened screws can damage the drive.
Configure the BIOS
1. Run the system setup program.
2. Enable LBA mode and UDMA mode, if applicable.
3. Select the auto-detect option.
4. Save and exit the system setup program.
Partitioning the drive in Windows XP / Windows 2000 (for systems where this is the 2nd drive in the system).
1. Boot into Windows XP.
2. Open Computer Management and select Disk Management.
3. Initialize the drive.
4. Partition the drive.
5. Format the drive.
6. Assign the drive letter.
7. Initiate changes.
How do I install an additional hard drive using Windows XP Disk Management?
Do not drop or bump the drive.
Keep the drive in the protective anti-static container until ready to install.
Protect the drive from static discharge by wearing a grounded wrist strap. Attach the wrist strap to the metal chassis of your computer.
Handle the drive by the edges of the frame.
Do not apply pressure or attach labels to the circuit board or the top cover of the drive.
Turn off the power to the host system before installation.
What you need
Phillips screwdriver and four 6-32 UNC drive mounting screws.
Standard 40-pin ATA interface cable, or an 80-conductor cable if running UATA66/100/133 (max length: 18 inches).
An unused drive power cable for your new drive.
Needle-nose pliers for removing or adding jumpers.
UltraATA 66/100/133 Considerations
If your new drive can support UltraATA 66/100/133 modes and you want to take advantage of these faster transfer rates, you will need the following:
A computer that supports UDMA Modes 3 and 4 (5 for UltraATA100, 6 for UltraATA133).
A 40-pin, 80-conductor cable (available from your dealer). This cable is provided with current UltraATA hard drive retail kits. It can be identified by its having a blue connector to connect to the motherboard, a grey connector to connect to the slave drive, and a black connector to connect to the master drive.
Installation ProceduresSetting the Jumpers
Master or Single Drive - Use this setting if the drive is the only drive on the ATA interface cable.
Drive is Slave - Use this setting if the drive is an additional drive on the cable and the original drive is set as Master.
Master with non-ATA compatible drive (Seagate® drives only) - Use this if the drive is Master to a CD-ROM, tape drive or other non-ATA drive.Note: It is preferred to have the CD-ROM and other non-hard drive products on the secondary ATA channel.
Cable-Select Option (Default) - Use with Ultra ATA cables. This allows the cable to select if the drive is master or slave based on the position on the cable. The Master drive goes on the black connector at the end of the cable, the slave drive connects to the gray connector in the middle and the host adapter connects to the blue connector at the other end of the cable.
Limit Capacity Option/Capacity Limitation Jumper (CLJ) - This option may be required if the system the drive is being installed into does not support the full capacity of the drive. If this jumper is required, your system cannot support a drive this large and can be updated with a PCI controller card.
Jumper Illustrations
Seagate Products :
http://www.seagate.com/images/support/en/us/u5_family_1.gif
Maxtor®/Quantum Products :
http://www.seagate.com/images/support/en/us/mxo_ata_jumpers.gif
Attaching Cables and Mounting the Drive
1. Locate a free device connector on the IDE interface cable in your computer.
2. Attach one end of the interface cable to the connector on the system board (see user's manual for locations). Align pin 1 on the cable with pin 1 on the connector. If using the 80-conductor cable, the blue connector should connect to the system board connector. The black connector goes to the Master and the Gray goes to the Slave.
3. Find an unused power connector on a cable coming from the computer power supply and attach it to the 4-pin DC power connector. The power connector is keyed so that it attaches one way only. DO NOT force it.
4. Mount the drive in either the horizontal or vertical position depending on your case orientation.
5. Slide the drive into the bay.
6. Secure the drive using four 6-32 UNC mounting screws. Caution: Do not overtighten the screws. Overtightened screws can damage the drive.
Configure the BIOS
1. Run the system setup program.
2. Enable LBA mode and UDMA mode, if applicable.
3. Select the auto-detect option.
4. Save and exit the system setup program.
Partitioning the drive in Windows XP / Windows 2000 (for systems where this is the 2nd drive in the system).
1. Boot into Windows XP.
2. Open Computer Management and select Disk Management.
3. Initialize the drive.
4. Partition the drive.
5. Format the drive.
6. Assign the drive letter.
7. Initiate changes.
How do I install an additional hard drive using Windows XP Disk Management?
1.Install Secondary drive.
2.Boot into Windows XP.
3.Open Computer Management and select Disk Management.
4.Initialize the drive.
5.Partition the drive.
6.Format the drive.
7.Assign the drive letter.
8.Initiate changes.
Opening Disk Management in XP
· Right click on My Computer.
· Choose Manage (This will open the Computer Management window).
· Choose Disk Management under the Storage category (Refer to Figure 1).
Figure 1 (Click on the image to view a larger image)
http://support.seagate.com/kbimg/3361-1.gif
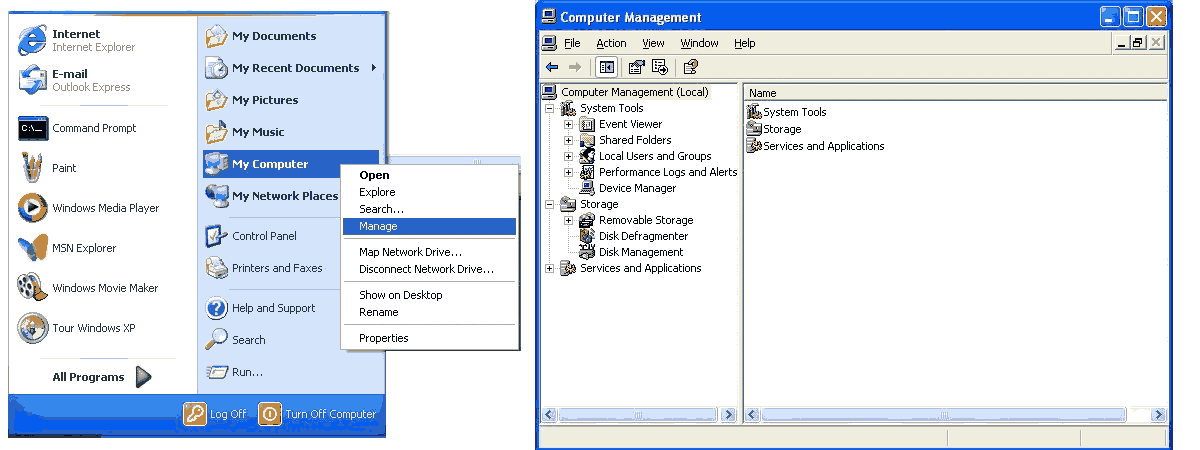
When the drive is first seen by Disk management it will not be seen in Windows Explorer. For the drive to been seen in Windows Explorer the drive will need to be configured through disk management. XP will normally see the unpartitioned drive when you open disk management and start the wizard for you.
Note the Unallocated Drive in Figure 2.
At this point XP will normally launch a wizard to walk you through setting up the drive, but it may be necessary to set it up manually. Figure 2 (Click on the image to view a larger image)
http://support.seagate.com/kbimg/3361-2Big.gif
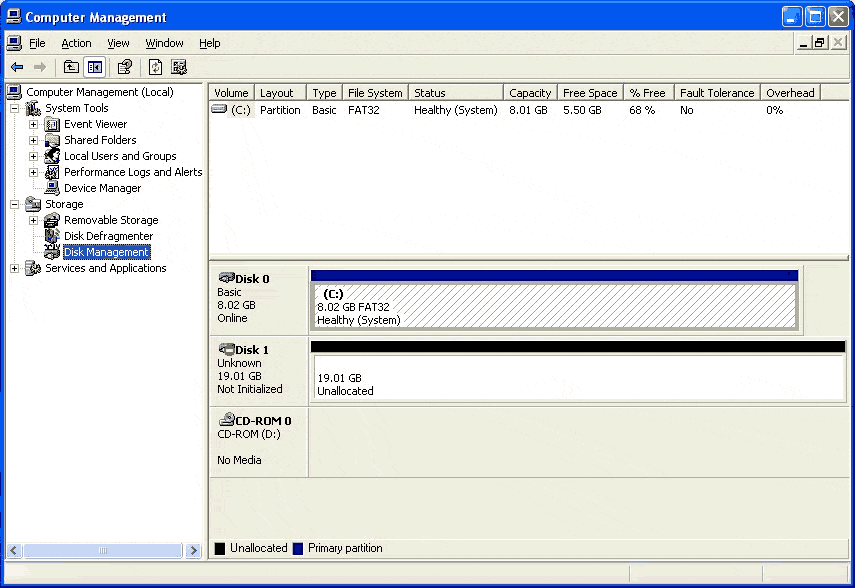
The Partition/Conversion Wizard Method
1.Select the drive to partition (The new drive).
2.Select the drive to Convert (Not needed for new drives).
3.A summary screen will tell what the wizard will do if you click on Finish. Confirm that the correct drive is selected.
4.Once you click on Finish, the drive will be initialized and you will be taken to the Partition Wizard. See Figure 3 for details.
Figure 3 (Click on the image to view a larger image)
Manually Initialize If the XP Initialize and Convert Hard Disk Wizard did not automatically open when you opened Disk Management, you will need to perform the following steps to initialize the hard disk drive.
1. Right click the new drive to initialize it (Refer to Figure 4). This prepares the drive to be used with Windows.
2. Once you choose initialize, another window will come up asking you to confirm which drive to initialize. Once a drive is initialized the data on the drive will be erased.
Figure 4 (Click on the image to view a larger image)
http://support.seagate.com/kbimg/3361-4Big.gif
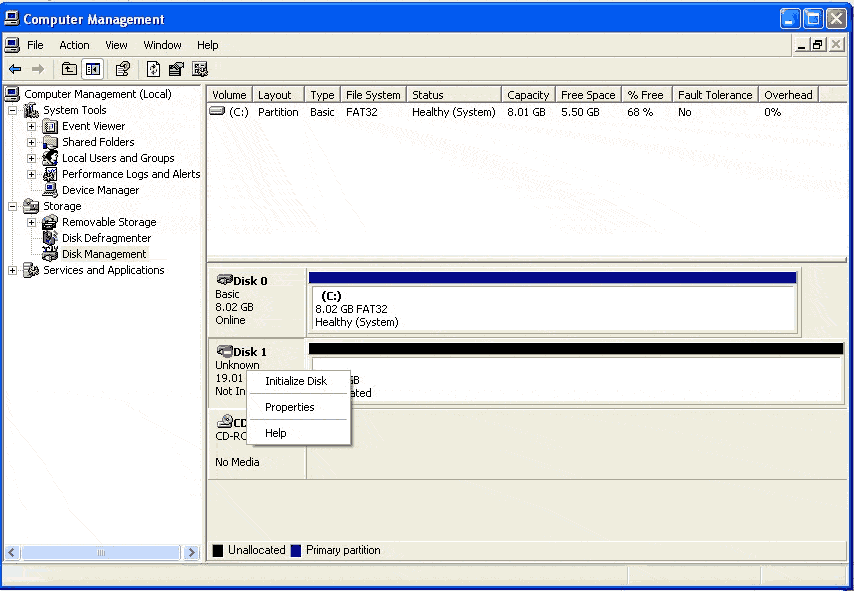
· Choose the correct drive. Windows will usually only display uninitialized drives, but if you have a dual boot system, drives from other operating systems will show up in this list.
· Once you choose OK, the drive will be initialized for use with Windows XP (It still will not be seen by Windows Explorer).
Figure 5 (Click on the image to view a larger image)
http://support.seagate.com/kbimg/3361-5Big.gif
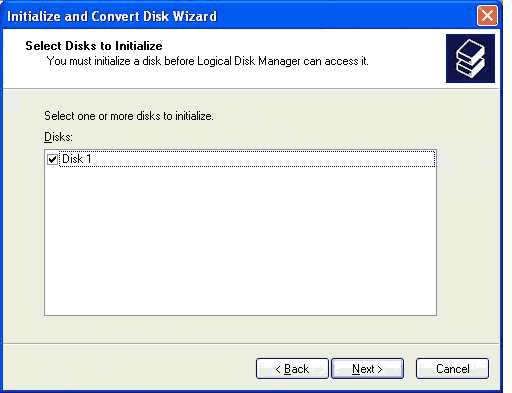
New Partition Wizard Once a drive is initialized for use with XP, you may format and partition the drive. This option is not available for drives that do not have free space or for drives that have not been initialized.
Right-click on the unallocated space, and select New Partition (Refer to Figure 6). Figure 6 (Click on the image to view a larger image)
http://support.seagate.com/kbimg/3361-6Big.gif
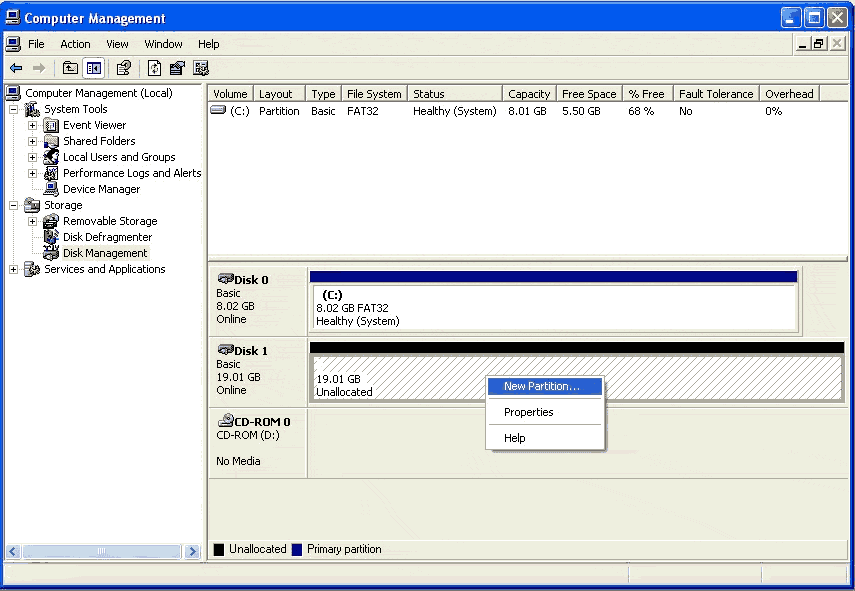
· Partition type: Primary – This is the normal selection for drives with less than 4 partitions. Extended – This is used if the drive is split in to 4 or more partitions. The default selection is Primary. Click on Next.
· Specify partition size in Megabytes - Set the size of the partition (The full drive capacity is the default). If you are creating a single partition, leave the default amount. If you are creating multiple partitions, enter the size in megabytes for your first partition. Click on Next.
· Assign the drive letter - This allows you to select the drive letter for this partition. The setup will default to the next available drive letter. You may also assign the drive to another letter that isn't in use if you like. Click on Next.
· Format Partition - The New Partition Wizard will by default be set to format the drive with an NTFS file system, a default unit allocation size, and a volume label of "New Volume". For a faster format, check the Perform a quick format option. Keep in mind that if you choose this option, the format will skip several verification processes. It is recommended that you leave the Enable file and folder compression option unchecked. Click on Next.
· Summary – Allows you one more chance before committing to the changes. If you do not wish to make any changes, click on Finish. (Refer to figures 7 and 8).
Figure 7 (Click on the image to view a larger image)
http://support.seagate.com/kbimg/3361-7Big.gif
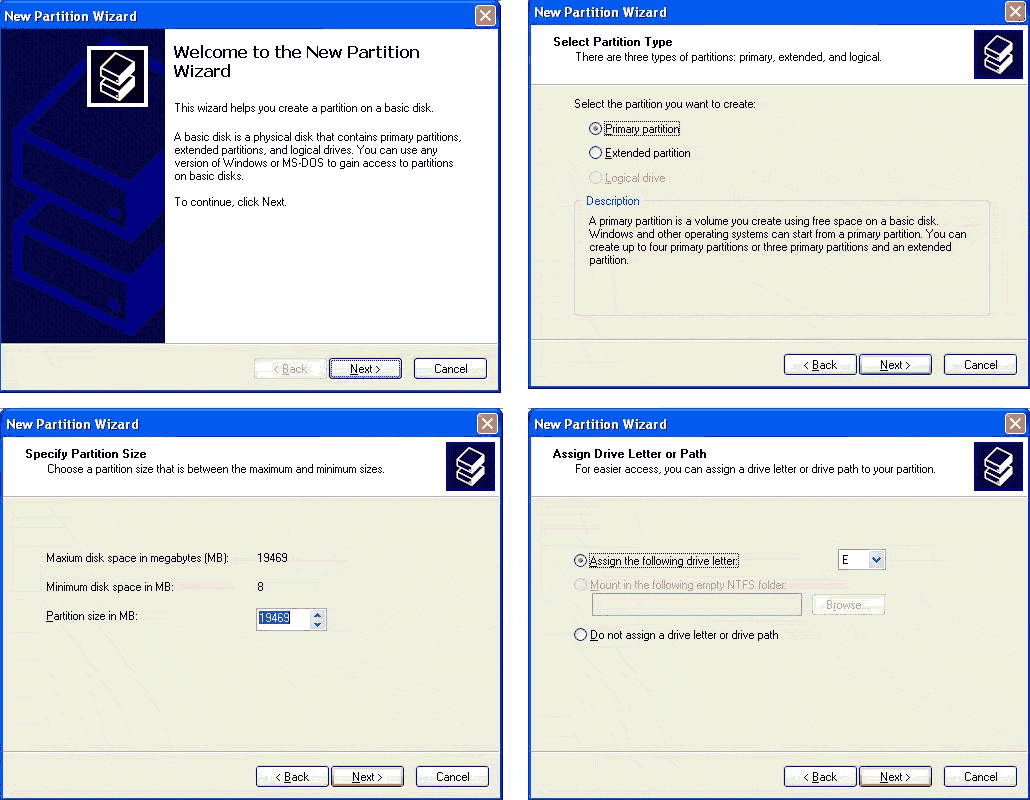
Figure 8 (Click on the image to view a larger image)
http://support.seagate.com/kbimg/3361-8Big.gif
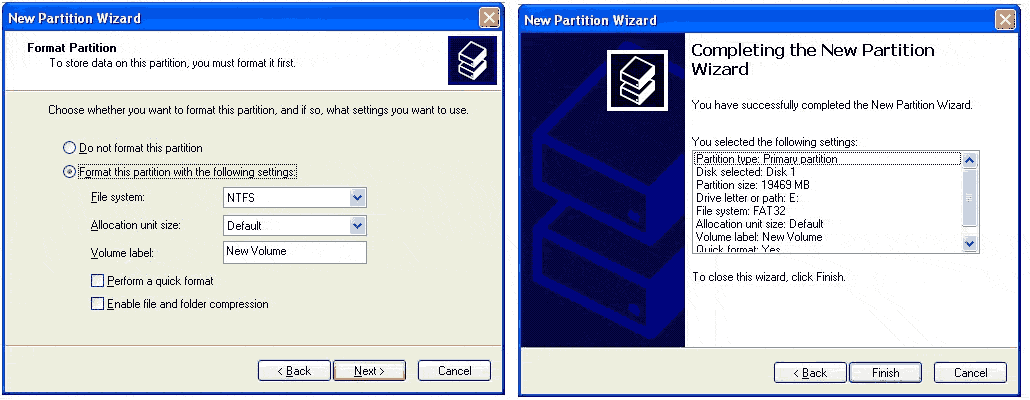
Finished Once you have clicked on the Finish button, the New Partition Wizard will close. In a few seconds, the "Unallocated" partition will say "Formatting". When the drive has completed formatting it will display as a healthy drive with the size and type of partition below the volume name and drive letter.
Figure 9 (Click on the image to view a larger image)
http://support.seagate.com/kbimg/3361-9Big.gif
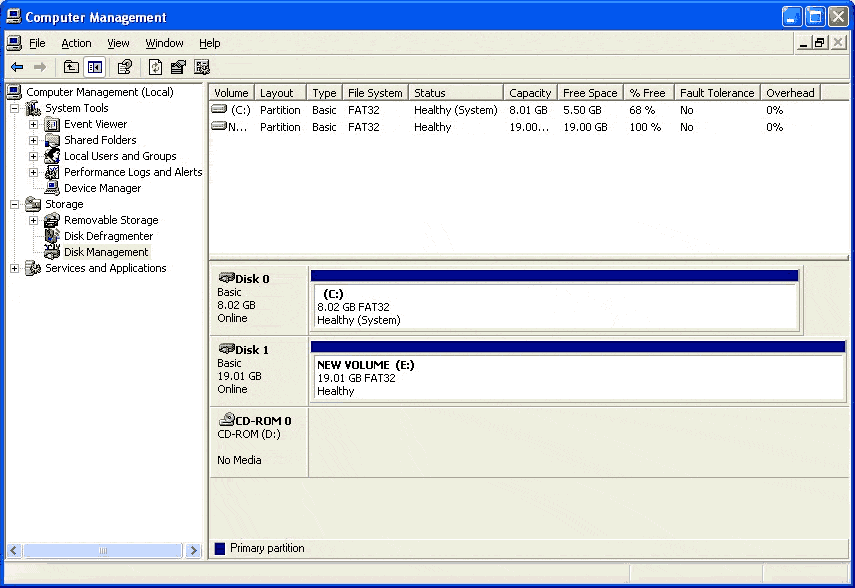
Identify which hard drive you have .
Identifying the type of hard drive you have with you .Match the model number of your drive and then find out what type of drive you have with you .
------------------------------------------------------------------------------------------------
Seagate / Maxtor drives
------------------------------------------------------------------------------------------------
Seagate FreeAgent Pro
ST303204FPA1E2-RK
ST305004FPA1E2-RK
ST307504FPA1E2-RK
ST303204FPA1E3-RK
ST305004FPA1E3-RK
ST307504FPA1E3-RK
ST310005FPA1E3-RK
Seagate FreeAgent Desktop
ST302504FDA1E1-RK
ST303204FDA1E1-RK
ST305004FDA1E1-RK
ST307504FDA1E1-RK
Seagate FreeAgent Go
ST900803FGA1E1-RK
ST901203FGA1E1-RK
ST901603FGA1E1-RK
Seagate 3.5-inch Pushbutton Backup and SATA (eSATA) External Hard Drive (120 GB - 750 GB)
ST3120027A-RK
ST3160026A-RK
ST3160024A-RK
ST3200823A-RK
ST3300801CB-RK
ST3400801CB-RK
ST3500601CB-RK
ST3400601CB-RK
ST3300601CB-RK
ST3250601CB-RK
ST3400601U2-RK
ST3300601U2-RK
ST3250601U2-RK
Seagate External SATA (eSATA) Hard Drive (300 GB - 500 GB)
ST3300601XS-RK
ST3500601XS-RK
The Seagate External Hard Drive 3.5 inch (80 GB - 250 GB)
ST380203U2-RK
ST3100203U2-RK
ST3120203U2-RK
ST3160203U2-RK
ST3250824U2-RK
The Seagate USB 2.0 Pocket Hard Drive (2.5 GB - 6 GB)
ST625211USB
ST650211USB
ST660211USB
Seagate Portable Hard Drive (40 GB - 160 GB)
ST940801U2-RK
ST9100801U2-RK
ST9120801U2-RK
ST910021U2-RK
ST9160821U2-RK
Seagate The Photo Drive(4 GB & 8 GB)
ST64022C-RK
ST68022C-RK
For details on the MIRRA Personal Server (Click on the link provided below)
http://www.seagate.com/ww/v/index.jsp?locale=en-US&name=Mirra_Support&vgnextoid=33fcb84a3266e010VgnVCM100000dd04090aRCRD
http://www.seagate.com/ww/v/index.jsp?locale=en-US&name=Mirra_Support&vgnextoid=33fcb84a3266e010VgnVCM100000dd04090aRCRD
Maxtor Basics Desktop
STM302503EHA301-RK
STM305003EHA301-RK
STM302503EHB301-RK
STM305003EHB301-RK
STM302503EHC301-RK
STM305003EHC301-RK
STM302503EHD301-RK
STM305003EHD301-RK
STM302503EHE301-RK
STM305003EHE301-RK
STM302503EHM301-RK
STM305003EHM301-RK
Maxtor Basics Portable
STM900801EHA301-RK
STM901601EHA301-RK
STM900801EHB301-RK
STM901601EHB301-RK
STM900801EHD301-RK
STM901601EHD301-RK
STM900801EHE301-RK
STM901601EHE301-RK
STM900801EHM301-RK
STM901601EHM301-RK
Maxtor OneTouch FireWire
A01C160
A01C200
A01C250
Maxtor OneTouch FireWire and USB
A01A160
A01A200
A01A250
A04A160
B01D300
Maxtor OneTouch USB
A01B080
A01B120
A01E160
A01E200
A01E250
A04B080
A04E160
A04E200
A04E250
Maxtor OneTouch II Firewire 800
E01V200
E01W300
E01W500
Maxtor OneTouch II Firewire and USB
E01A200
E01G250
E01G300
E01G500
E14G250
E14G300
Maxtor OneTouch II USB
E01E100
E01E200
E01H300
E01H500
E04E100
E14E200
E30E160
E30E200
E30H250
Maxtor OneTouch III FireWire 400 and USB 2.0
F01A200
F01G300
F01G500
F01XXXX
T01G300
T01G500
T01G750
Maxtor OneTouch III FireWire 800 FireWire 400 and USB 2.0
T01W300
T01W500
T01W750
Maxtor OneTouch III Mini Edition
R01E060 (Windows Only)
R01E100 (Windows Only)
R01E080 (Windows & MacOS)
R01E120 (Windows & MacOS)
R01E160 (Windows & MacOS)
Maxtor OneTouch III Turbo Edition
C01W010
C01W015
G01W006
G01W010
G01Y006
Maxtor OneTouch III USB 2.0
F01E200
F01H300
F01H500
T01E160
T01H300
T01H500
T01H750
Maxtor OneTouch 4 USB 2.0
STM302503OTA3E1-RK
STM305004OTA3E1-RK
STM307504OTA3E1-RK
STM302503OTB3E1-RK
STM305004OTB3E1-RK
STM307504OTB3E1-RK
Maxtor OneTouch 4 Plus
STM302504OTA3E5-RK
STM305004OTA3E5-RK
STM307504OTA3E5-RK
STM310004OTA3E5-RK
STM302503OTB3E5-RK
STM305004OTB3E5-RK
STM307504OTB3E5-RK
STM310004OTA3E5-RK
Maxtor OneTouch 4 Mini
STM900803OTA3E1-RK
STM901203OTA3E1-RK
STM901603OTA3E1-RK
STM902503OTA3E1-RK
STM903203OTA3E1-RK
STM900803OTB3E1-RK
STM901203OTB3E1-RK
STM901603OTB3E1-RK
STM902503OTB3E1-RK
STM903203OTB3E1-RK
Maxtor BlackArmor (Windows only)
------------------------------------------------------------------------------------------------
Seagate / Maxtor drives
------------------------------------------------------------------------------------------------
Seagate FreeAgent Pro
ST303204FPA1E2-RK
ST305004FPA1E2-RK
ST307504FPA1E2-RK
ST303204FPA1E3-RK
ST305004FPA1E3-RK
ST307504FPA1E3-RK
ST310005FPA1E3-RK
Seagate FreeAgent Desktop
ST302504FDA1E1-RK
ST303204FDA1E1-RK
ST305004FDA1E1-RK
ST307504FDA1E1-RK
Seagate FreeAgent Go
ST900803FGA1E1-RK
ST901203FGA1E1-RK
ST901603FGA1E1-RK
Seagate 3.5-inch Pushbutton Backup and SATA (eSATA) External Hard Drive (120 GB - 750 GB)
ST3120027A-RK
ST3160026A-RK
ST3160024A-RK
ST3200823A-RK
ST3300801CB-RK
ST3400801CB-RK
ST3500601CB-RK
ST3400601CB-RK
ST3300601CB-RK
ST3250601CB-RK
ST3400601U2-RK
ST3300601U2-RK
ST3250601U2-RK
Seagate External SATA (eSATA) Hard Drive (300 GB - 500 GB)
ST3300601XS-RK
ST3500601XS-RK
The Seagate External Hard Drive 3.5 inch (80 GB - 250 GB)
ST380203U2-RK
ST3100203U2-RK
ST3120203U2-RK
ST3160203U2-RK
ST3250824U2-RK
The Seagate USB 2.0 Pocket Hard Drive (2.5 GB - 6 GB)
ST625211USB
ST650211USB
ST660211USB
Seagate Portable Hard Drive (40 GB - 160 GB)
ST940801U2-RK
ST9100801U2-RK
ST9120801U2-RK
ST910021U2-RK
ST9160821U2-RK
Seagate The Photo Drive(4 GB & 8 GB)
ST64022C-RK
ST68022C-RK
For details on the MIRRA Personal Server (Click on the link provided below)
http://www.seagate.com/ww/v/index.jsp?locale=en-US&name=Mirra_Support&vgnextoid=33fcb84a3266e010VgnVCM100000dd04090aRCRD
http://www.seagate.com/ww/v/index.jsp?locale=en-US&name=Mirra_Support&vgnextoid=33fcb84a3266e010VgnVCM100000dd04090aRCRD
Maxtor Basics Desktop
STM302503EHA301-RK
STM305003EHA301-RK
STM302503EHB301-RK
STM305003EHB301-RK
STM302503EHC301-RK
STM305003EHC301-RK
STM302503EHD301-RK
STM305003EHD301-RK
STM302503EHE301-RK
STM305003EHE301-RK
STM302503EHM301-RK
STM305003EHM301-RK
Maxtor Basics Portable
STM900801EHA301-RK
STM901601EHA301-RK
STM900801EHB301-RK
STM901601EHB301-RK
STM900801EHD301-RK
STM901601EHD301-RK
STM900801EHE301-RK
STM901601EHE301-RK
STM900801EHM301-RK
STM901601EHM301-RK
Maxtor OneTouch FireWire
A01C160
A01C200
A01C250
Maxtor OneTouch FireWire and USB
A01A160
A01A200
A01A250
A04A160
B01D300
Maxtor OneTouch USB
A01B080
A01B120
A01E160
A01E200
A01E250
A04B080
A04E160
A04E200
A04E250
Maxtor OneTouch II Firewire 800
E01V200
E01W300
E01W500
Maxtor OneTouch II Firewire and USB
E01A200
E01G250
E01G300
E01G500
E14G250
E14G300
Maxtor OneTouch II USB
E01E100
E01E200
E01H300
E01H500
E04E100
E14E200
E30E160
E30E200
E30H250
Maxtor OneTouch III FireWire 400 and USB 2.0
F01A200
F01G300
F01G500
F01XXXX
T01G300
T01G500
T01G750
Maxtor OneTouch III FireWire 800 FireWire 400 and USB 2.0
T01W300
T01W500
T01W750
Maxtor OneTouch III Mini Edition
R01E060 (Windows Only)
R01E100 (Windows Only)
R01E080 (Windows & MacOS)
R01E120 (Windows & MacOS)
R01E160 (Windows & MacOS)
Maxtor OneTouch III Turbo Edition
C01W010
C01W015
G01W006
G01W010
G01Y006
Maxtor OneTouch III USB 2.0
F01E200
F01H300
F01H500
T01E160
T01H300
T01H500
T01H750
Maxtor OneTouch 4 USB 2.0
STM302503OTA3E1-RK
STM305004OTA3E1-RK
STM307504OTA3E1-RK
STM302503OTB3E1-RK
STM305004OTB3E1-RK
STM307504OTB3E1-RK
Maxtor OneTouch 4 Plus
STM302504OTA3E5-RK
STM305004OTA3E5-RK
STM307504OTA3E5-RK
STM310004OTA3E5-RK
STM302503OTB3E5-RK
STM305004OTB3E5-RK
STM307504OTB3E5-RK
STM310004OTA3E5-RK
Maxtor OneTouch 4 Mini
STM900803OTA3E1-RK
STM901203OTA3E1-RK
STM901603OTA3E1-RK
STM902503OTA3E1-RK
STM903203OTA3E1-RK
STM900803OTB3E1-RK
STM901203OTB3E1-RK
STM901603OTB3E1-RK
STM902503OTB3E1-RK
STM903203OTB3E1-RK
Maxtor BlackArmor (Windows only)
STM901603BAA1E1-RK
Maxtor Perstonal Storage (please refer to the link provided below for detailed information on PS)
Maxtor Shared Storage II
N01R010
N02R010
S01R300
S01R320
S01R500
Maxtor Shared Storage Plus
H01AXXX
H01P200
H01R300
H01R500
Maxtor Shared Storage
H01AXXX
H01P200
H01R300
H14P200
H14R300
Maxtor Fusion
B01Q500-R008
Maxtor Central Axis Network Storage Server
STM310005CAA00G
Subscribe to:
Comments (Atom)